Making Mondays – Tagxedo word art

Always looking for ways to make easy art with the children – this site is a dream!

Instead of a simple word cloud, at Tagxedo.com you can choose from an astonishing array of shapes, and make real  ‘word art’.

tagxedo dog trudyktaylor blog4

  • Firstly, paste in your blog url, or text, or individual words.
  • Choose your shape. Hearts, elephants, bats – I even saw a witch’s hat in there!
  • Choose from a beautiful range of colour themes.
  • Even choose your fonts!
  • Then create, and save to jpg, or share on Facebook or Twitter.
  • They have a shop where you can buy mugs and stuff with your word picture on it.

I can see tons of uses for this:

  • A family word picture, with all our names on it.
  • For Father’s Day, the word ‘Dad’ repeated, and printed out to stick on a card.
  • For Valentine’s Day, the word ‘Love’, to stick on a card or frame and give to someone special.
  • Your child’s name, printed out to frame, maybe even print out 16 or 25 of them, each one in a different colour theme, in a smaller size, and then collage them together!
  • The words of a favourite poem or song.

The possibilities are endless!!!

These are the words it picked up from the blog.

Strangely, at some point I have used the words ‘sandwich’ and ‘rice’, which taken out of context seems a trifle odd! I’ve also used the word ‘really’ a lot more than I should. Happily, ‘Chocolate’ seems nice and emboldened, but where is ‘coffee’? This blog runs on coffee, yet no mention of it – strange…..perhaps it is my guilty little secret, only now revealed…

(Upon further investigation, I’ve uncovered ‘sandwich’ tins, ‘rice’ krispies – see, makes more sense now!)

Have you tried this? Can you think of any more uses for tagxedo?

Cheat’s Pizza Cake – with Rice Krispies

This cake is so easy to make, it feels like cheating! You can make it yourself, or let your children do it – it’s that simple!

Rice Krispie Cake

You will need:

  • A big sandwich cake tin, for getting a nice round shape, and some clingfilm or greaseproof paper to line it with.
  • Rice Krispie cake mixture (the kind made with marshmallow) OR  a real cheat – ready-made Rice Krispie Squares, the chewy marshmallow ones.
  • Strawberry or raspberry seedless jam
  • Sweets! I used Dolly Mixtures, Minstrels, Smarties and Jelly Tots. Anything goes, I guess – just not blue sweets….I’ve never seen anything blue on a pizza, and I’d be suspicious if I did!
  • Grated white chocolate.

Instructions

  1. Make your Rice Krispie mixture,  OR  if you’re using the ready-made Rice Krispie Squares, take them out of their packets, put them in a bowl and warm in the microwave for 15-30 seconds. This will make them all moist and pliable.
  2. Form your mixture into a pizza shape in your lined tin, pressing down firmly, and score into slices. Then cool in the fridge.   (Scoring into slices makes it easier to serve, and  the toppings don’t get destroyed by cutting it up later)
  3. Use seedless jam for tomato sauce, and a selection of sweets for toppings to decorate the base. I used Minstrels, Dolly Mixtures, Smarties and Jelly Tots.
  4. Finish with a grating of white chocolate, which looks amazingly like cheese.
  5. Serve it up, and soak up all that praise!


How to make a Baseball Cap Cake

My daughter wanted a cake shaped like her favourite baseball cap.  And this is how it turned out.

cake

 Here’s how I did it….

For the cake –

  • Chocolate fudge icing, I used Nigella’s recipe.

  • Enough sponge cake mix to fill a dome shaped tin.

cake  2bFor the decorating –

  • Roll out icing, pre-coloured or plain ( but then you’ll need to colour it)

  • One Smartie. Don’t worry, it’s not a waste –  you can eat the rest of the packet!

  • White icing for the logo.

  • A golden chocolate coin

  • Icing sugar for easy rolling

  1. Because she likes chocolate, I used a basic chocolate Victoria sponge recipe. And if you’re lucky enough to have a dome shaped tin, then this will be easy for you, but I cheated and used a sandwich tin, and this bowl –cake 1
  2. I scoured my cupboards and found a bowl that was slightly larger in diameter than my sandwich tin. I was sure the bowl would crack in the oven, and that I’d be off to the shops to buy a ‘proper’ domed tin – but it worked a treat! I lined it with greaseproof paper, and filled it halfway to make the domed top. And halfway brought it to about the same diameter as my sandwich tin, which I used to make the base cake to give me the height and shape I needed. cake 2cake  2x
  3. I sandwiched the base to the domed top using lot and lots of Nigella’s chocolate fudge icing. And then as if that wasn’t enough, I covered the outside too! This is great icing, completely delicious and really easy to spread. And then I put it in the fridge to chill.cake  2a
  4. Now it’s time to get busy with the roll out icing. Roll it out large enough to easily cover the dome, then place it on top, mould it to fit, and trim any excess. I made a couple of little holes by pressing too hard, but these are easily fixed by pushing the icing gently together again.cake 3
  5. Easy bit now… find a suitably coloured Smartie, and stick it to the top of your cake with a drop of water. And it might be the time to pause for a moment, admire your work, and munch a few of the ‘wasted’ Smarties. Then use a cocktail stick or wooden barbeque skewer to mark the seams on the crown of the ‘baseball cap’. The cap is divided into sixths, starting at the Smartie if you got it just in the middle!cake 5
  6. Use the cocktail stick to mark out the stitches , and the little air holes at the top of the cap.cake 6cake  6b
  7. Now roll out a piece of icing for the peak of the cap, and place it on the cake board, shaping to fit.cake  7
  8. Cut it to shape, then mark out all the seam lines on the peak.cake  7a
  9. And there you have it, all ready to add logo and details.cake  8
  10. I used a golden chocolate coin, and iced the name on there, and I used shop bought white writing icing to make a logo. cake  9

My daughter and her friends were thrilled!

The most difficult part was finding the right shaped ‘tin’, but the decoration itself is a doddle! And if you give it a try, do let me know how it works for you, or send me a link if you’ve posted a picture!

Happy Baking!


Making Mondays – Easy hamburger cupcakes

As I’m trying to catch up on my Nanowrimo wordcount this weekend – an easy post for me – how to make hamburger cupcakes with the children.

These cupcakes are the quick and easy relation of those found online here at Bakerella. I once made the Bakerella version for a party, complete with fries in a little personalised holder, but for everyday……..

how to make hamburger cupcake

…..these little cakes are SO easy.

The ingredients:

  • Cupcakes, home made or store bought,
  • Green butter icing,
  • Yellow butter icing,
  • Seedless jam,
  • Jaffa cakes, or similar chocolate cookies.

how to make hamburger cupcakes

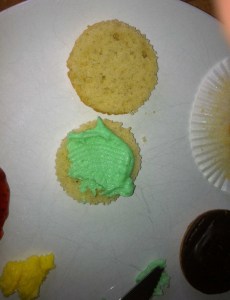
Remove your cupcakes from their cases, and slice in half. Spread icing on the base of the cake.

easy hamburger cakes

Place the Jaffa cake or cookie on the icing, and then top with more green icing (lettuce), yellow icing (mustard) and jam (ketchup).

easy hamburger cakesThen put the top of the burger on. SO EASY.

I don’t think they’re any healthier than the real thing, but children love sweet food masquerading as something else – especially if they can make it themselves!

Have fun with it!

;

;

;

;

Making Mondays – how to make Tree Skeleton Art with the children.

As Autumn turns colder, trees are beginning to reveal their starkly bare skeletons, and it’s surprisingly easy to make beautiful art based on these natural sculptures.

This picture was made by my daughter when she was 8.

bare tree, how to make bare tree art

Fun, effective, and you may already have the ‘ingredients’ in the house – the chief ingredient being children with lots of puff! Continue reading